Data Management with Drizzle ORM, Supabase and Next.js for Web & Mobile Applications
2024-08-12
As a solo entrepreneur aiming to build AI or generative AI-powered products that users will love, you need tools that streamline your development process without compromising on power or flexibility, so that you can focus on building the capabilities and features that actually improves user experience.
One of these crucial tools is an ORM (Object-Relational Mapping) solution, which helps you manage your database interactions effortlessly.
In this guide, I’ll walk you through:
- A brief introduction to Drizzle ORM
- Setting up a Next.js project with Drizzle ORM
- Defining your database schemas
- Configuring a Supabase database
- Seeding your data
- Fetching and displaying data in your Next.js application
If you have a basic understanding of SQL, you’re in for a treat — Drizzle ORM allows you to leverage that knowledge while enjoying the safety and flexibility that TypeScript provides.
Let’s goooo!

Why Drizzle ORM?
If you think of your AI-powered product like a restaurant. Your data is the ingredients, stored in the kitchen (your database).
The application code is your chef, who needs clear, precise instructions to create the perfect dish (your final product) for your users.
Drizzle ORM, or other ORMs, acts as your chef’s recipe book. It knows exactly where every ingredient is stored and how to use them effectively:
- Finding Ingredients: Drizzle ORM locates your data.
- Mixing Ingredients Safely: It ensures that everything is combined correctly, preventing costly mistakes.
- Preparing Efficiently: With Drizzle, your “chef” works quickly and efficiently, optimizing resources and speeding up your product development.
Without an ORM like Drizzle, you’d be left juggling these tasks manually, which could slow down your progress and introduce errors — neither of which you can afford when you’re building a product on your own.
Drizzle ORM is a lightweight, TypeScript-first tool that offers the flexibility you need, especially when dealing with complex queries.
And if you’re familiar with SQL, you’ll find Drizzle’s syntax intuitive and easy to work with.
Let’s have a quick look at a few examples:
# Simple Select query in SQL
SELECT * FROM users WHERE id = 1;

# Drizzle ORM
const user = await db.select().from(usersTable).where(eq(usersTable.id, 1));

# Simple Join query in SQL
SELECT orders.id, users.name
FROM orders
JOIN users ON orders.user_id = users.id;

# Drizzle ORM
const ordersWithUsers = await db
  .select({
    orderId: ordersTable.id,
    userName: usersTable.name
  })
  .from(ordersTable)
  .join(usersTable, eq(ordersTable.userId, usersTable.id));

# Simple INSERT Query in SQL
INSERT INTO users (name, email) VALUES ('John Doe', 'john@example.com');

# Drizzle ORM
await db.insert(usersTable).values({
  name: 'John Doe',
  email: 'john@example.com'
});
You got the idea and plus, it’s designed to be lightweight and serverless-ready, giving you fast performance with zero dependencies.
Let’s dive in and see how Drizzle ORM can become a key ingredient in your development toolkit.
Initialize the project
First, let’s set up a new Next.js project:
npx create-next-app@latest
Install packages
Install the required packages for Drizzle ORM, PostgreSQL, and other utilities:
npm update --save
npm update --save-dev
npm i drizzle-orm postgres
npm i -D drizzle-kit
npm i @paralleldrive/cuid2
npm i dotenv
npm i -D tsx
- drizzle-orm: The ORM itself.
- drizzle-kit: A tool for schema migrations.
- postgres: PostgreSQL client for Node.js.
- paralleldrive/cuid2: Generates secure, collision-resistant IDs.
- tsx: A tool to run TypeScript files with modern defaults.
paralleldrive/cuid2 is for Secure, collision-resistant ids optimized for horizontal scaling and performance, and you can think of tsx as an alias to node tsx runs your TypeScript code with modern and sensible defaults, making it user-friendly and especially great for beginners.
Setting up Supabase
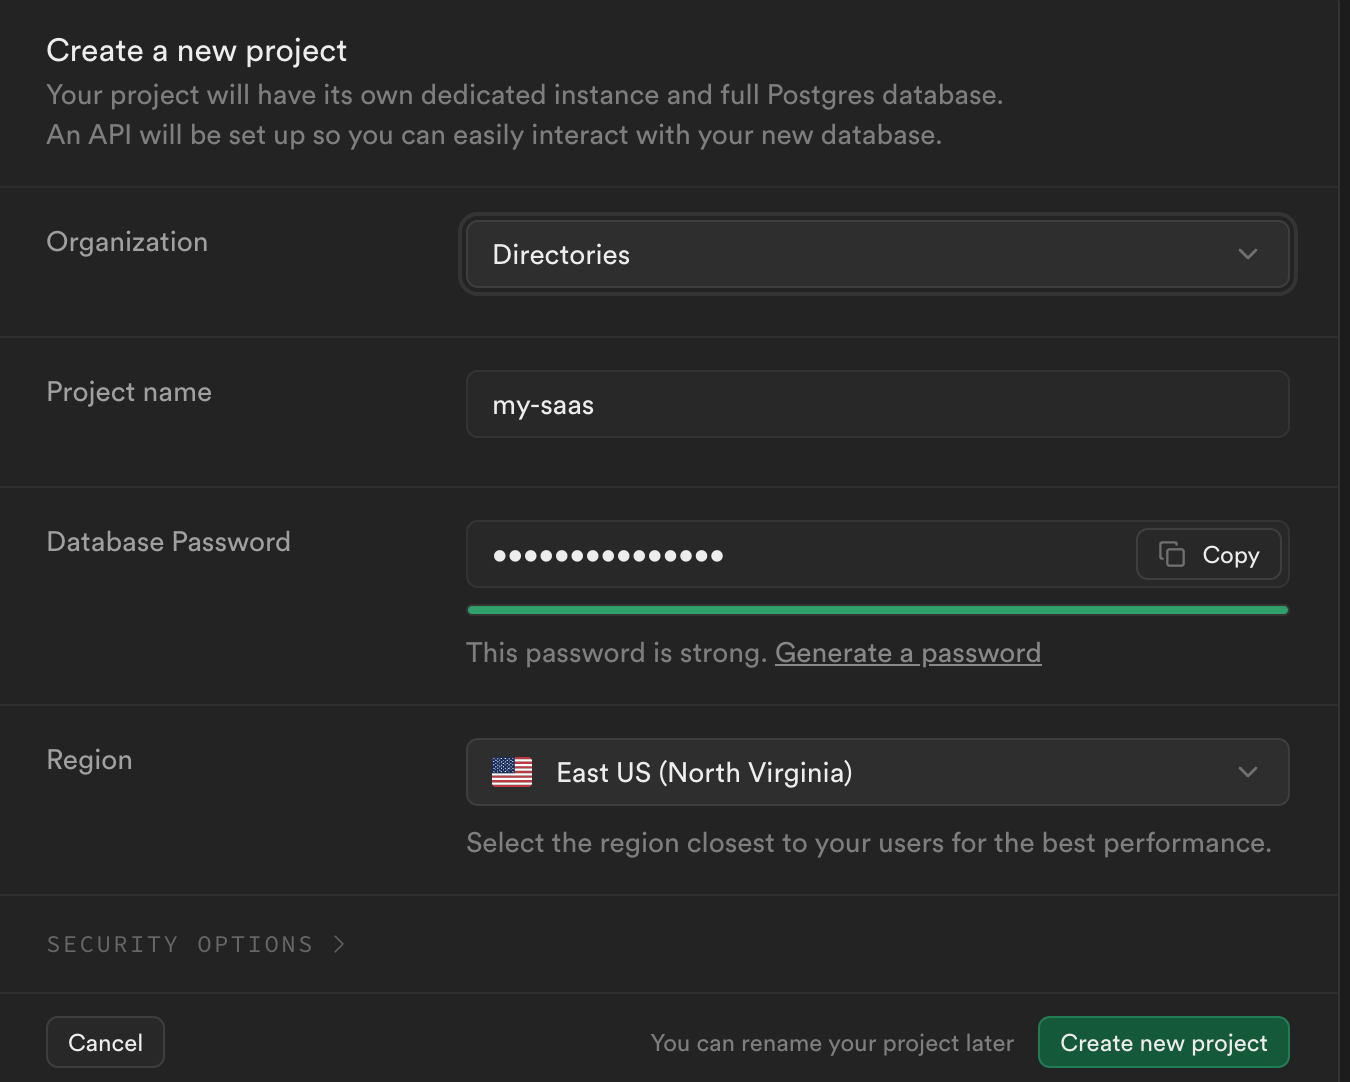
First, create an organization if you haven’t already, and the click on “New project”:

Then fill in the required fields:

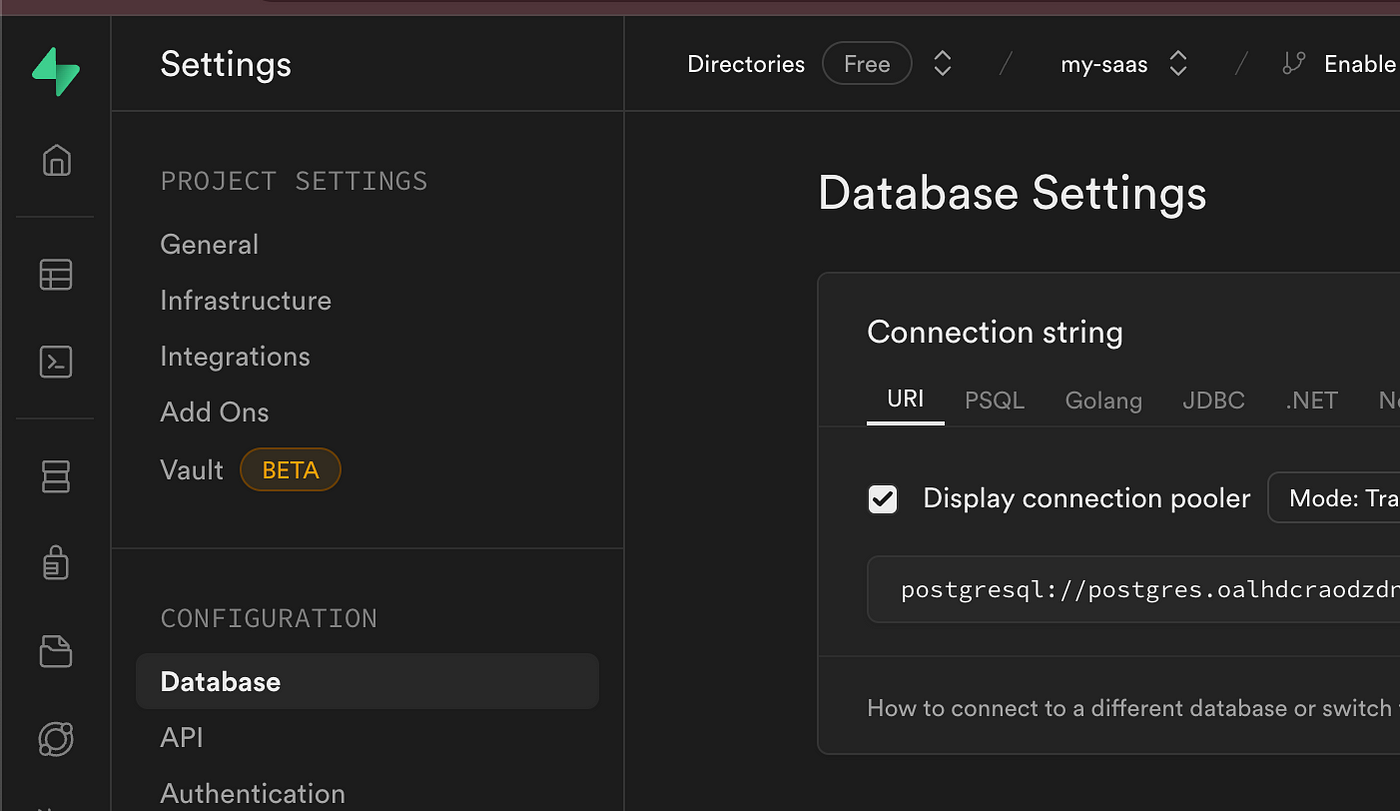
Next, we’ll need to retrieve the connection string from the Settings -> Database section in Supabase

and store it securely in a .env file within your Next.js project.
DATABASE_URL=postgres://postgres...
Initialize Drizzle
Start by creating drizzle.config.ts in the project root.
import { defineConfig } from "drizzle-kit";
export default defineConfig({
  dialect: "postgresql",
  schema: "./src/db/schema.ts",
  out: "./drizzle",
  dbCredentials: {
    url: process.env.DATABASE_URL!,
  },
});
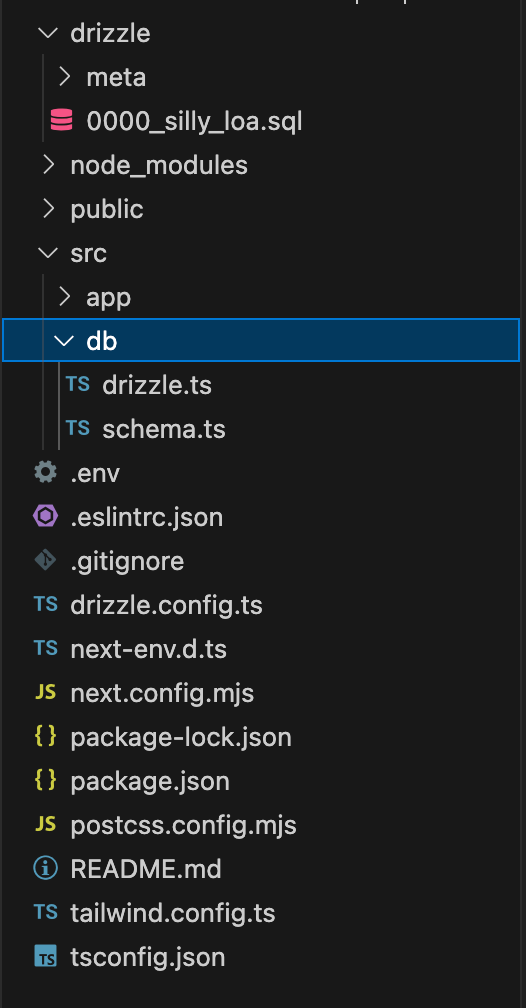
Folder structure
If you run into any problems, you can check out how I structure the project in this tutorial.

To interact with the database in our project, we’ll place the Drizzle client initialization code in the db/drizzle.ts file.
import { drizzle } from 'drizzle-orm/postgres-js';
import postgres from 'postgres';

import * as schema from "./schema";

const sql = postgres(process.env.DATABASE_URL!);
// @ts-ignore
const db = drizzle(sql, { schema });

export default db;
Defining Database Schema
We will define 3 tables in schema.ts located in the db folder. We'll enforce a one-to-one relationship using a unique constraint on the orderId column. Additionally, we will use cuid2 for generating unique identifiers.
import { serial, text, integer, timestamp, pgTable } from "drizzle-orm/pg-core";
import { createId } from "@paralleldrive/cuid2";

// Define the user table schema
export const user = pgTable("user", {
  id: text("id").primaryKey().unique().$defaultFn(() => createId()),
  name: text("name"),
  email: text("email"),
  password: text("password"),
  role: text("role").$type<"admin" | "customer">(),
  createdAt: timestamp("created_at"),
  updatedAt: timestamp("updated_at"),
});

// Define the courses table schema
export const courses = pgTable("courses", {
  id: text("id").primaryKey().unique().$defaultFn(() => createId()),
  title: text("title"),
  description: text("description"),
  createdAt: timestamp("created_at"),
  updatedAt: timestamp("updated_at"),
});

export const userCourses = pgTable("user_courses", {
  id: text("id").primaryKey().unique().$defaultFn(() => createId()),
  user_id: text("user_id")
    .notNull()
    .references(() => user.id, {
      onDelete: "cascade",
      onUpdate: "cascade",
    }),
  course_id: text("course_id")
    .notNull()
    .references(() => courses.id, {
      onDelete: "cascade",
      onUpdate: "cascade",
    }),
});
You can now run npm run generate to create these tables.

Seeding data
Before we start fetching some data, we need to insert some.
import "dotenv/config";
import { drizzle } from "drizzle-orm/postgres-js";
import postgres from "postgres";
import { createId } from "@paralleldrive/cuid2";

import * as schema from "../../db/schema";
const sql = postgres(process.env.DATABASE_URL!);
// @ts-ignore
const db = drizzle(sql, { schema });

const main = async () => {
    try {
        console.log("Seeding database");

        const users = await db.insert(schema.user).values([
            {
                id: createId(),
                name: "Alice",
                email: "alice@example.com",
                password: "password123",
                role: "admin",
                createdAt: new Date(),
                updatedAt: new Date(),
            },
            {
                id: createId(),
                name: "Bob",
                email: "bob@example.com",
                password: "password456",
                role: "customer",
                createdAt: new Date(),
                updatedAt: new Date(),
            },
            {
                id: createId(),
                name: "Charlie",
                email: "charlie@example.com",
                password: "password789",
                role: "customer",
                createdAt: new Date(),
                updatedAt: new Date(),
            },
            {
                id: createId(),
                name: "David",
                email: "david@example.com",
                password: "password321",
                role: "customer",
                createdAt: new Date(),
                updatedAt: new Date(),
            },
            {
                id: createId(),
                name: "Eve",
                email: "eve@example.com",
                password: "password654",
                role: "customer",
                createdAt: new Date(),
                updatedAt: new Date(),
            },
        ]).returning({
            id: schema.user.id,
            name: schema.user.name,
            email: schema.user.email,
        });

        console.log("Seeded users:", users);

        const courses = await db.insert(schema.courses).values([
            {
                id: createId(),
                title: "Introduction to Programming",
                description: "Learn the basics of programming.",
                createdAt: new Date(),
                updatedAt: new Date(),
            },
            {
                id: createId(),
                title: "Advanced JavaScript",
                description: "Deep dive into JavaScript.",
                createdAt: new Date(),
                updatedAt: new Date(),
            },
            {
                id: createId(),
                title: "Database Design",
                description: "Learn how to design databases.",
                createdAt: new Date(),
                updatedAt: new Date(),
            },
            {
                id: createId(),
                title: "Web Development",
                description: "Create stunning websites.",
                createdAt: new Date(),
                updatedAt: new Date(),
            },
            {
                id: createId(),
                title: "Machine Learning",
                description: "Introduction to machine learning.",
                createdAt: new Date(),
                updatedAt: new Date(),
            },
        ]).returning({
            id: schema.courses.id,
            title: schema.courses.title,
            description: schema.courses.description,
        });

        console.log("Seeded courses:", courses);

        const userCourses = await db.insert(schema.userCourses).values([
            {
                id: createId(),
                user_id: users[0].id,
                course_id: courses[0].id,
            },
            {
                id: createId(),
                user_id: users[1].id,
                course_id: courses[1].id,
            },
            {
                id: createId(),
                user_id: users[2].id,
                course_id: courses[2].id,
            },
            {
                id: createId(),
                user_id: users[3].id,
                course_id: courses[3].id,
            },
            {
                id: createId(),
                user_id: users[4].id,
                course_id: courses[4].id,
            },
        ]).returning({
            id: schema.userCourses.id,
            user_id: schema.userCourses.user_id,
            course_id: schema.userCourses.course_id,
        });

        console.log("Seeded user_courses:", userCourses);

        console.log("Seeding finished");
    } catch (error) {
        console.error(error);
        throw new Error("Failed to seed the database");
    }
};

main();
To make running queries easier, I’ve added the commands to package.json.
"scripts": {
 "dev": "next dev",
 "build": "next build",
 "start": "next start",
 "lint": "next lint",
 "generate": "drizzle-kit generate",
 "migrate": "drizzle-kit migrate",
 "db:seed": "tsx ./src/utility/data/dBseed.ts"
}
You can now run npm run db:seed to populate the tables.

Fetching the Data
In order to fetch results in convenient way, we need to make a few more changes to our schema.ts:
...
import { relations } from "drizzle-orm";
...
// Define relations for user table
export const userRelations = relations(user, ({ many }) => ({
    userCourses: many(userCourses),
  }));

// Define relations for courses table
export const coursesRelations = relations(courses, ({ many }) => ({
userCourses: many(userCourses),
}));

// Define relations for user_courses table
export const userCoursesRelations = relations(userCourses, ({ one }) => ({
user: one(user, {
    fields: [userCourses.user_id],
    references: [user.id],
}),
course: one(courses, {
    fields: [userCourses.course_id],
    references: [courses.id],
}),
}));
Now, create a queryTest folder in /src/app directory, and create page.tsx:
import db from "../../db/drizzle";
import { eq } from "drizzle-orm/sql/expressions/conditions";
import { user, courses, userCourses } from "../../db/schema";

export default async function Page() {
    const userFound = await db.query.user.findFirst({
        where: eq(user.id, "vvzfgp0jjq4lk2edlg01ez8m"),
        with: {
            userCourses: true,
        }
    });

    console.log("USER:", userFound);

    return (
        <div>User fetch test</div>
    );
}
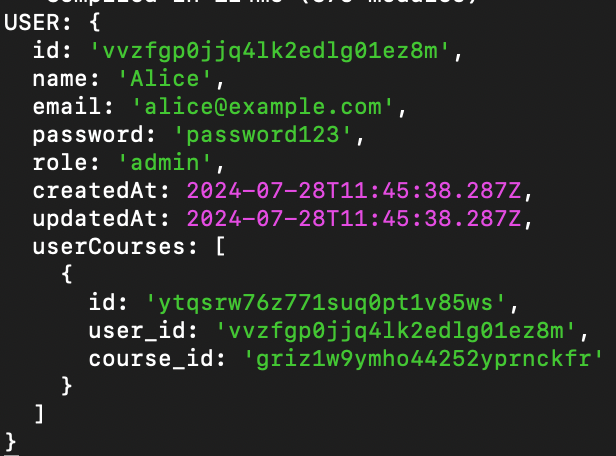
When you run npm run dev and visit http://localhost:3000/queryTest you should see the following in your terminal:

Nice, with one query, we are able to join data from two tables and creates one object. You can now use this object to further query courses and display user and course information in your application.
Stay in the loop
Wrap Up
By now, you should know enough to play around on your own. Here’s the documentation that you can refer further.
Next in this series, we will look into how to handle user authentication and authorization.
Let me know if you want to see anything else related to product design and development on web and mobile platforms!
Here’s also some practitioner resources that we published lately.
Thank you for stopping by, and being an integral part of our community.
Happy building!
