Fine-Tune Meta’s Latest AI Model: Customize Llama 3.1 5x Faster with 80% Less Memory
2024-08-17
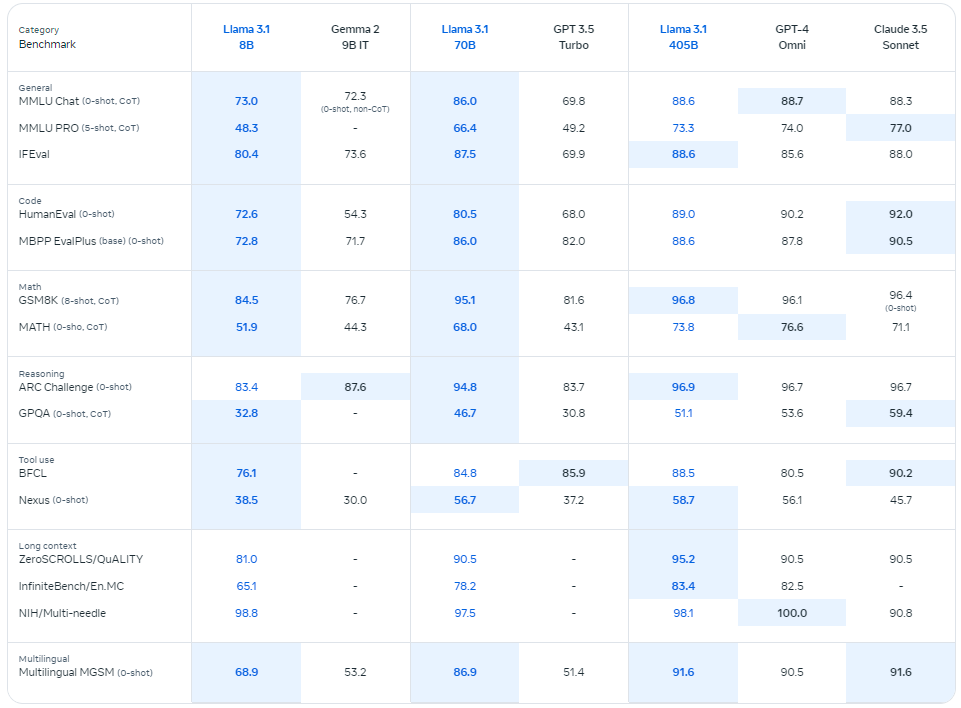
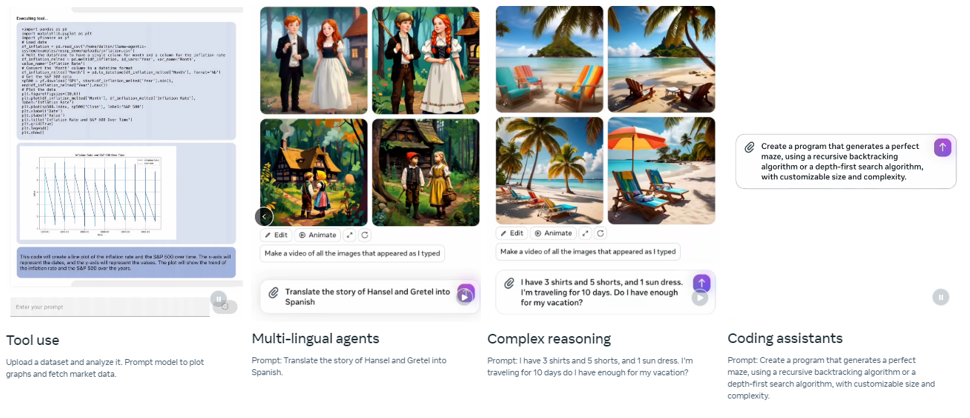
So, when Meta dropped the Llama 3.1 405B model, its massive 128,000-token context window immediately posed a serious threat to closed-source models from OpenAI and Anthropic.
And they didn’t stop there — they also rolled out upgraded versions of their 70B and 8B models, and these upgrades are nothing to sneeze at.
Just take another look at the benchmarks:

Llama 3.1 comes with a pretty flexible license that allows for commercial use, as long as your company has fewer than 700 million monthly active users.
For most of us, this means we can use it without any major headaches, though Meta’s biggest competitors might have to negotiate something different.
Now, here’s something every developer needs to keep in mind..
For fine-tuning models, your fine-tuning data can really up your game, but when you’re working with models this sophisticated, efficient use of both hardware and software is also very crucial.
Why? Because the faster you can run experiments, the more iterations you can get through, and the quicker you’ll reach the best possible results. Otherwise lengthy experimentation process will frustrate you (and everyone in your team).
In this article, I will walk you through fine-tuning Llama 3.1 8B model using Unsloth, which will help you to finetune Llama 3.1, Mistral, Phi-3 & Gemma models 2–5x faster with 80% less memory!
Let’s GOOOO!

Setting up environment for Llama 3.1 fine-tuning
Let’s first set up a virtual environment and install libraries. Open your command line interface — this could be your Command Prompt, Terminal, or any other CLI tool you’re comfortable with — and run the following commands:
Create a virtual environment
mkdir llama3-finetuning && cd llama3-finetuning
python3 -m venv llama3-finetuning-env
source llama3-finetuning-env/bin/activate
I’m then installing torch==2.1.1 with cu118, and a few other essential packages such as Unsloth and Xformers :
pip3 install torch==2.1.1 torchvision==0.16.1 torchaudio==2.1.1 --index-url https://download.pytorch.org/whl/cu118
pip3 install "unsloth[cu118-torch211] @ git+https://github.com/unslothai/unsloth.git"
pip3 install --no-deps xformers trl peft accelerate bitsandbytes
pip3 install ipykernel jupyter
Got the libraries in place:
- Unsloth is optimized for speed and efficiency.
- Xformers will help you handle memory, which is crucial when working with large langulage models.
Model selection and configuration
Now that we’ve got our tools, let’s choose and configure our model.
Here’s how you can load a pre-trained Llama model:
from unsloth import FastLanguageModel
import torch
<LineBreak />
max_seq_length = 2048  # RoPE Scaling is internally supported
dtype = None  # None for auto detection. Float16 for Tesla T4, V100, Bfloat16 for Ampere+
load_in_4bit = True  # 4bit quantization to reduce memory usage
In this case, we’re optimizing for performance and memory usage.
The 4-bit quantization is particularly handy — it reduces memory footprint, making it possible to work with larger models even on more modest hardware.
Loading pre-quantized models
With our configuration in place, it’s time to load the model:
model, tokenizer = FastLanguageModel.from_pretrained(
    model_name="unsloth/Meta-Llama-3.1-8B",
    max_seq_length=max_seq_length,
    dtype=dtype,
    load_in_4bit=load_in_4bit,
)
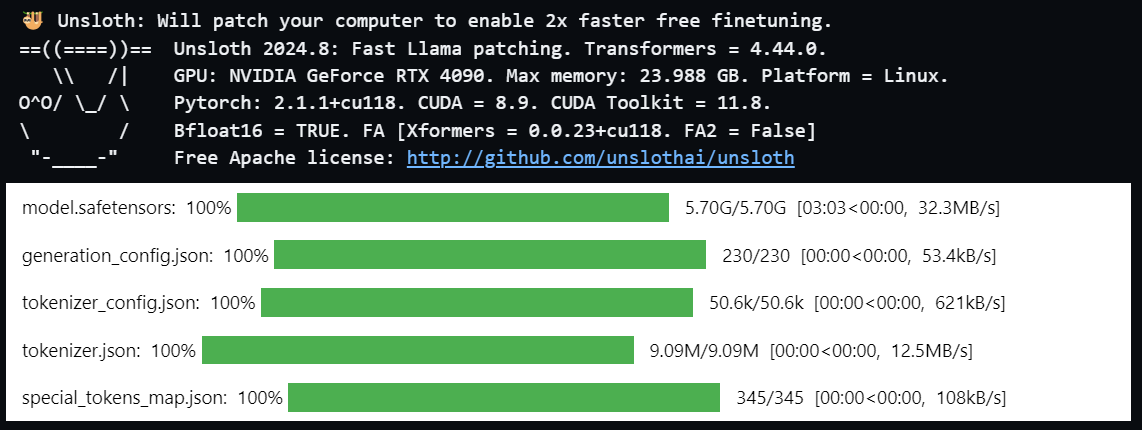
It will take sometime to download the model.

Loading pre-quantized models speeds up the entire process.
You get faster downloads and fewer out-of-memory errors, which is a big win when working with large datasets or models.
Adding LoRA adapters
Next, let’s enhance our model with LoRA (Low-Rank Adaptation) adapters:
model = FastLanguageModel.get_peft_model(
    model,
    r=16,  # You can choose any number > 0 ! Suggested 8, 16, 32, 64, 128
    target_modules=["q_proj", "k_proj", "v_proj", "o_proj", "gate_proj", "up_proj", "down_proj"],
    lora_alpha=16,
    lora_dropout=0,  # Supports any, but = 0 is optimized
    bias="none",  # Supports any, but = "none" is optimized
    use_gradient_checkpointing="unsloth",  # True or "unsloth" for very long context
    random_state=3407,
    use_rslora=False,  # Rank stabilized LoRA is also supported
    loftq_config=None,  # and LoftQ
)
By updating only a small fraction of the model’s parameters, you can make your training process much more efficient with LoRA adapters.

It’s a way to improve performance without getting bogged down by massive computational requirements.
Before we start preparing the fine-tuning data, let us add:
To the next section.
Preparing fine-tuning data
Let’s move on to preparing the data. Here’s how you can load and format the Alpaca dataset:
alpaca_prompt = """Below is an instruction that describes a task, paired with an input that provides further context. Write a response that appropriately completes the request.

### Instruction:
{}

### Input:
{}

### Response:
{}"""

EOS_TOKEN = tokenizer.eos_token # Must add EOS_TOKEN
def formatting_prompts_func(examples):
    instructions = examples["instruction"]
    inputs       = examples["input"]
    outputs      = examples["output"]
    texts = []
    for instruction, input, output in zip(instructions, inputs, outputs):
        # Must add EOS_TOKEN, otherwise your generation will go on forever!
        text = alpaca_prompt.format(instruction, input, output) + EOS_TOKEN
        texts.append(text)
    return { "text" : texts, }
pass

from datasets import load_dataset
dataset = load_dataset("yahma/alpaca-cleaned", split = "train")
dataset = dataset.map(formatting_prompts_func, batched = True,)
If your data isn’t in the right shape, the model won’t perform well, no matter how powerful it is.
By using a cleaned and formatted dataset, you ensure that your model gets the most relevant and structured information for better results.

OK let’s start the fine-tuning process.
Fine-tuning Llama 3.1 8B model with SFTTrainer
Now comes the exciting part — training your model.
Here’s the code you’ll use:
from trl import SFTTrainer
from transformers import TrainingArguments
from unsloth import is_bfloat16_supported

trainer = SFTTrainer(
    model = model,
    tokenizer = tokenizer,
    train_dataset = dataset,
    dataset_text_field = "text",
    max_seq_length = max_seq_length,
    dataset_num_proc = 2,
    packing = False, # Can make training 5x faster for short sequences.
    args = TrainingArguments(
        per_device_train_batch_size = 2,
        gradient_accumulation_steps = 4,
        warmup_steps = 5,
        # num_train_epochs = 1, # Set this for 1 full training run.
        max_steps = 60,
        learning_rate = 2e-4,
        fp16 = not is_bfloat16_supported(),
        bf16 = is_bfloat16_supported(),
        logging_steps = 1,
        optim = "adamw_8bit",
        weight_decay = 0.01,
        lr_scheduler_type = "linear",
        seed = 3407,
        output_dir = "outputs",
    ),
)
This is where everything comes together, let me explain what’s happening here:
- SFTTrainer is a specialized trainer designed for supervised fine-tuning of language models.
- TrainingArgumentsis used to specify various training parameters and configurations.
- trainer = SFTTrainer(...) initializes the SFTTrainer with several important components:
- model=model: The pre-trained LLaMA model you want to fine-tune.
- tokenizer=tokenizer: The tokenizer associated with the model, used to process the input text.
- train_dataset=dataset: The dataset on which the model will be fine-tuned. This dataset contains the input-output pairs used for training.
- max_seq_length=max_seq_length: Specifies the maximum sequence length for inputs. Longer sequences will be truncated to this length.
- per_device_train_batch_size=2: Specifies that each training device (GPU or TPU) will process 2 examples per batch.
- gradient_accumulation_steps=4: Accumulates gradients over 4 steps before performing a weight update, effectively increasing the batch size without requiring more memory.
- max_steps=60: The total number of training steps.
- learning_rate=2e-4: The initial learning rate for the optimizer, controlling the step size at each iteration while moving toward a minimum of the loss function.
- fp16=not is_bfloat16_supported(): If bfloat16 (a lower precision format) is not supported by the hardware, use fp16 (16-bit floating point precision). This helps reduce memory usage and speed up training.
- bf16=is_bfloat16_supported(): Uses bfloat16 precision if supported by the hardware.
- logging_steps=1: Logs the training progress every step, providing detailed output on each training step.
- optim='adamw_8bit': Uses the adamw_8bit optimizer, which is a memory-efficient version of the Adam optimizer.
- weight_decay=0.01: Applies a weight decay (L2 regularization) of 0.01 to prevent overfitting by penalizing large weights.
- lr_scheduler_type='linear': Uses a linear learning rate scheduler, which decreases the learning rate linearly over the course of training.
- seed=3407: Sets a random seed for reproducibility, ensuring that the training process can be replicated exactly.
- output_dir='outputs': Specifies the directory where the model checkpoints and other outputs will be saved.
By setting these parameters, you’re fine-tuning the process to make the most of your hardware, and this calibration is what will ultimately determine the quality and efficiency of your model.
You can also see the GPU stats:
gpu_stats = torch.cuda.get_device_properties(0)
start_gpu_memory = round(torch.cuda.max_memory_reserved() / 1024 / 1024 / 1024, 3)
max_memory = round(gpu_stats.total_memory / 1024 / 1024 / 1024, 3)
print(f"GPU = {gpu_stats.name}. Max memory = {max_memory} GB.")
print(f"{start_gpu_memory} GB of memory reserved.")

and finally:
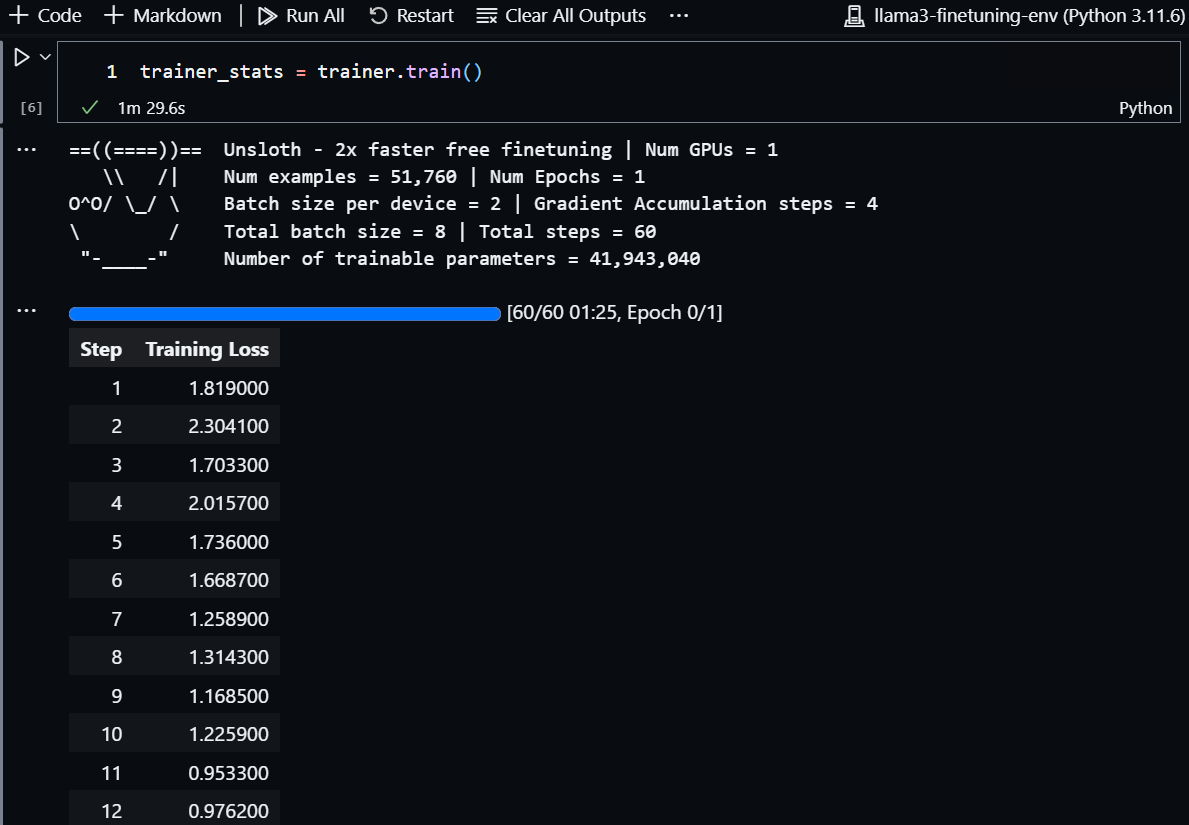
- trainer_stats = trainer.train()initiates the training process with the configurations specified. The model will be fine-tuned on the provided dataset using the defined training arguments.
Let’s run it:
trainer_stats = trainer.train(
Training process went smooth and fast on my end.

Let’s further look into training stats:
used_memory = round(torch.cuda.max_memory_reserved() / 1024 / 1024 / 1024, 3)
used_memory_for_lora = round(used_memory - start_gpu_memory, 3)
used_percentage = round(used_memory         /max_memory*100, 3)
lora_percentage = round(used_memory_for_lora/max_memory*100, 3)
print(f"{trainer_stats.metrics['train_runtime']} seconds used for training.")
print(f"{round(trainer_stats.metrics['train_runtime']/60, 2)} minutes used for training.")
print(f"Peak reserved memory = {used_memory} GB.")
print(f"Peak reserved memory for training = {used_memory_for_lora} GB.")
print(f"Peak reserved memory % of max memory = {used_percentage} %.")
print(f"Peak reserved memory for training % of max memory = {lora_percentage} %.")
Peak reserved memory was ~9GB and peak reserved memory for training was ~3GB:

Testing Llama 3.1 8B responses after fine-tuning
Let’s see our model in action!
Stay in the loop
Here’s how to run an inference:
FastLanguageModel.for_inference(model) # Enable native 2x faster inference
inputs = tokenizer(
[
    alpaca_prompt.format(
        "Write a Python function that takes a list of integers as input and returns the sum of all even numbers in the list.", # instruction
        "[1, 2, 3, 4, 5, 6, 7, 8, 9, 10]", # input
        "", # output - leave this blank for generation!
    )
], return_tensors = "pt").to("cuda")

outputs = model.generate(**inputs, max_new_tokens = 64, use_cache = True)
tokenizer.batch_decode(outputs)

# for streaming responses
# from transformers import TextStreamer
# text_streamer = TextStreamer(tokenizer)
# _ = model.generate(**inputs, streamer = text_streamer, max_new_tokens = 128)
Here’s the output:
['<|begin_of_text|>Below is an instruction that describes a task, paired
with an input that provides further context. Write a response that
appropriately completes the request.\n\n### Instruction:\nWrite a Python
function that takes a list of integers as input and returns the sum of all
even numbers in the list.\n\n### Input:\n[1, 2, 3, 4, 5, 6, 7, 8, 9, 10]\n\n###

Response:
The function can be implemented as follows:

def sum_even_numbers(lst):
  """Return the sum of all even numbers in the list."""
  return sum(num for num in lst if num % 2 == 0)

In this implementation, we use a list comprehension to filter out all
odd numbers

With the optimized inference setup, you get faster, more responsive outputs, which is important when you’re iterating on models or testing different configurations.
Saving Llama 3.1 8B fine-tuned model
Finally, let’s save our fine-tuned model:
model.save_pretrained("lora_model")  # Local saving
tokenizer.save_pretrained("lora_model")
Whether you’re saving locally or pushing to an online repository, it’s also good to have naming conventions that work for you.
Now if you want to load the LoRA adapters later for inference, set False to True:
if False:
    from unsloth import FastLanguageModel
    model, tokenizer = FastLanguageModel.from_pretrained(
        model_name = "lora_model", # YOUR MODEL YOU USED FOR TRAINING
        max_seq_length = max_seq_length,
        dtype = dtype,
        load_in_4bit = load_in_4bit,
    )
    FastLanguageModel.for_inference(model) # Enable native 2x faster inference

# alpaca_prompt = You MUST copy from above!

inputs = tokenizer(
[
    alpaca_prompt.format(
        "What is the time complexity of the binary search algorithm, and why?", # instruction
        "", # input
        "", # output - leave this blank for generation!
    )
], return_tensors = "pt").to("cuda")

from transformers import TextStreamer
text_streamer = TextStreamer(tokenizer)
_ = model.generate(**inputs, streamer = text_streamer, max_new_tokens = 128)
And that’s it! This guide wasn’t just about getting the job done — it was about understanding the why behind each action, and I hope you learned a few tricks along the way.
Bonus Content : Building with AI
And don’t forget to have a look at some practitioner resources that we published recently:
Thank you for stopping by, and being an integral part of our community.
Happy building!
